正文摘要:
《紅色沙漠》後期畢業配裝 快速閱讀精華
🚀 核心目標:挑戰高難度怪物時,用16級攻速+特效齒輪打出極限輸出
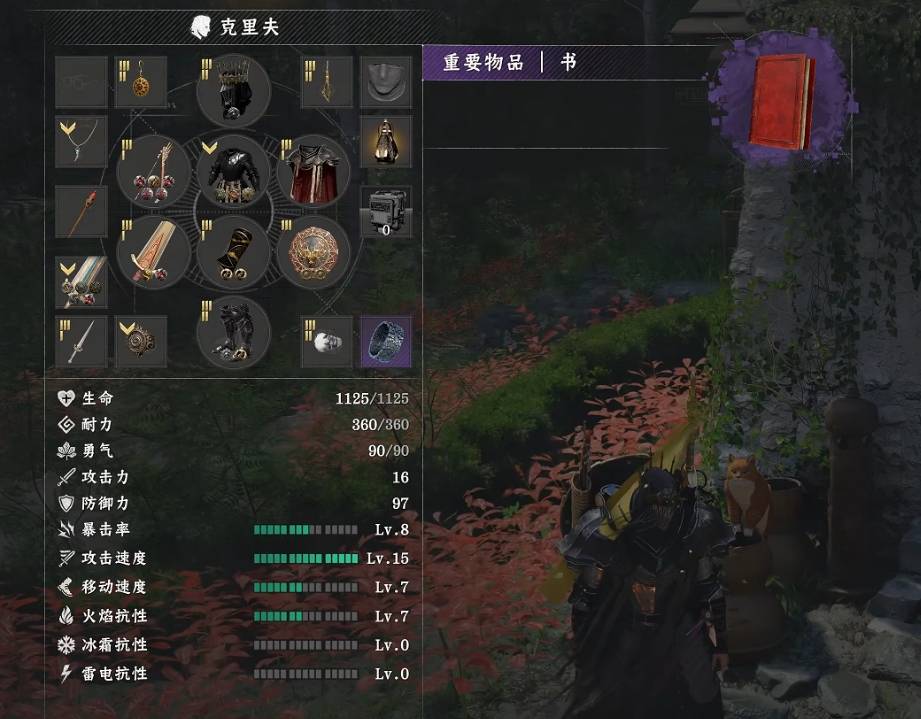
古代耳環/女巫耳環:滿級自帶移速+4,唯二選擇塔里布布制手套:滿級自帶攻速+3,後期核心裝備💪 關鍵數值:
攻速10後收益遞減,可犧牲2級攻速換力量審判暴擊堆高後收益極高,雙手武器建議自帶暴擊詞條防禦70以上收益變小,改堆減傷或耐力循環🔑 武器選擇:
雙手武器:自帶暴擊詞條,強滿+3暴擊,只插1顆暴擊齒輪弓箭:2顆不潔之劍必帶 + 2顆暴擊+3 + 項鍊暴擊+8 = 14暴擊
.article-toc { border: 1px solid #ddd; padding: 15px; background: #f9f9f9; border-radius: 6px; margin: 20px 0; width: 90%;}.article-toc br { display: none;}.toc-title { /* --- 以下是合併進來的 H2 樣式 --- */ font-size: 1.25em; /* 125% */ border-left: 5px solid #2A98DA; border-radius: 2px; padding: 5px 0px 5px 10px; font-weight: bold; margin: 0 0 15px 0; /* 調整了 margin,只留下方 15px */ color: #333; line-height: 1.5; background-color: #f8f8f8; /* --- 樣式合併結束 --- */}.toc-list { list-style: none; padding-left: 0;}.toc-list li { margin: 8px 0;}.toc-list a { color: #2A98DA; text-decoration: none;}.toc-list a:hover { text-decoration: underline;}.back-to-top { display: block; margin-top: 10px; font-size: 0.9em; color: #666;}本文章目錄
耳環選擇:移速與舒適度優先document.currentScript.previousElementSibling.href = location.href.split('#')[0] + '#earring';
頭盔與防具:減傷堆疊策略document.currentScript.previousElementSibling.href = location.href.split('#')[0] + '#armor';
手套與鞋子:16級攻速達成術document.currentScript.previousElementSibling.href = location.href.split('#')[0] + '#gloves_shoes';
戒指搭配:黑暗印記與白虎的取捨document.currentScript.previousElementSibling.href = location.href.split('#')[0] + '#ring';
武器與弓箭:暴擊與特效齒輪document.currentScript.previousElementSibling.href = location.href.split('#')[0] + '#weapon_bow';
盾牌與項鍊:防禦與暴擊的平衡document.currentScript.previousElementSibling.href = location.href.split('#')[0] + '#shield_necklace';
常見問題Q&Adocument.currentScript.previousElementSibling.href = location.href.split('#')[0] + '#faq';
耳環選擇:移速與舒適度優先
我們實測後發現,《紅色沙漠》後期耳環的選擇其實非常單純——古代耳環和女巫耳環是唯二值得投入的選項。兩者滿級都自帶移速+4的屬性,這在後期地圖探索與頭目戰走位時至關重要。
雙手武器我們強烈推薦自帶暴擊詞條的選擇——強滿後就有暴擊+3,這樣只需要再插1顆暴擊齒輪就能達標。犧牲一點攻擊換一個孔位,我們認為是划算的,因為暴擊堆高後的收益非常可觀。剩餘孔位可視個人流派選擇特效齒輪。
以下廣告滑動後還有帖子內容var custom_call_MIR = function (params) {if ( params === null || params.hasAd === false ) {var divRowSide;for (let index = 0; index < ONEADs.length; index++) {if (ONEADs[index].pub.player_mode === "mobile-inread") {divRowSide = ONEADs[index].pub.slotobj;}}var ins = document.createElement('ins');ins.className = 'clickforceads';ins.setAttribute('style', 'display:inline-block;');ins.setAttribute('data-ad-zone', '18264');divRowSide.appendChild(ins);var js = document.createElement('script');js.async = true;js.type = 'text/javascript';js.setAttribute('src', '//cdn.holmesmind.com/js/init.js');js.onload = function(){console.log('[ONEAD MIR] ClickForce Loaded');};divRowSide.appendChild(js);}};var _ONEAD = {};_ONEAD.pub = {};_ONEAD.pub.slotobj = document.getElementById("oneadMIRDFPTag");_ONEAD.pub.slots = ["div-onead-ad"];_ONEAD.pub.uid = "1000509";_ONEAD.pub.external_url = "https://onead.onevision.com.tw/";_ONEAD.pub.scopes = ["spotbuy", "speed"];_ONEAD.pub.player_mode_div = "div-onead-ad";_ONEAD.pub.player_mode = "mobile-inread";_ONEAD.pub.queryAdCallback = custom_call_MIR;var ONEAD_pubs = ONEAD_pubs || [];ONEAD_pubs.push(_ONEAD);var truvidScript = document.createElement('script'); truvidScript.async = true; truvidScript.setAttribute('data-cfasync','false'); truvidScript.type = 'text/javascript'; truvidScript.src = '//stg.truvidplayer.com/index.php?sub_user_id=597&widget_id=3309&playlist_id=2381&m=a&cb=' + (Math.random() * 10000000000000000); var currentScript = document.currentScript || document.scripts[document.scripts.length - 1]; currentScript.parentNode.insertBefore(truvidScript, currentScript.nextSibling);
《紅色沙漠》後期畢業配裝常見問題Q&A
Q:攻速16和攻速14差很多嗎?一定要撐到16嗎?
攻速10後收益會遞減,但16級攻速能讓你的技能循環更流暢。如果裝備還沒畢業,先撐到10-12級也能用,後期再慢慢補滿。
Q:為什麼不推薦堆防禦到100?
經過我們實測,防禦70以上後減傷效率明顯下降。與其硬堆防禦,不如轉向減傷、耐力循環或移速,整體生存體驗反而更好。
Q:雙手武器和單手+盾牌哪個比較好?
雙手武器輸出上限較高,適合熟悉頭目機制的玩家;單手+盾牌容錯率較高,適合穩健打法。本文配裝以雙手武器為主,但盾牌的防禦加成對雙手武器也有幫助。
Q:特效齒輪要選哪種?
黯鴉索命、否定之珠、暗影利爪是攻速特效流的核心選擇。若你走其他流派,可視技能特性選擇對應特效。
Q:這套配裝適合PVP嗎?
本文配裝主要針對PVE高難度頭目設計。PVP需要考慮韌性、控制抗性等屬性,建議另外調整。
《紅色沙漠》重點回顧
後期配裝核心在於攻速門檻與孔位效率——16級攻速是理想目標,但10級後可彈性調整暴擊與移速是後期最難取代的屬性,優先確保耳環、項鍊、武器的暴擊來源防禦70後轉向減傷或功能型齒輪,戰鬥舒適度往往比紙面數字更重要
B站實機影片影片


 收藏
收藏
